如何用 Python編輯與操作WORD文件

這篇文章主要說明如何自動化處理 WORD文件,編輯、讀取、創建等。
因為Microsoft WORD 應用程式是 Windows Application 因此無法用Selenium 來進行自動化操作。
如果使用UI (Sikuli, pywinauto, PyAutoGUI, AutoIT) 方式的自動化測試,
最大的缺點是容易受到畫面解析度的影響而操作失敗。
因此,當要模擬許多 WORD文件的創建、編輯、存檔時的操作時,有沒有比較好的自動化方式呢?
python-docx
筆者推薦的方式是使用 “python-docx”,這個模組讓我們可以很簡便的針對 WORD 文件操作。
這是 Python的額外安裝模組,透過下列方式安裝
pip install python-docx |
建立 WORD檔案範例
[pastacode lang=”markup” message=”” highlight=”” provider=”manual”]
import docx
doc = docx.Document()
doc.add_paragraph('Hello world!')
doc.save('helloWorld.docx')
[/pastacode]
讀取 WORD 範例
[pastacode lang=”markup” message=”” highlight=”” provider=”manual”]
import readDocx
print(readDocx.getText('HelloWorld.docx'))
[/pastacode]
進階 WORD 編輯

[pastacode lang=”python” message=”” highlight=”” provider=”manual”]
from docx import Document
from docx.shared import Inches

document = Document()

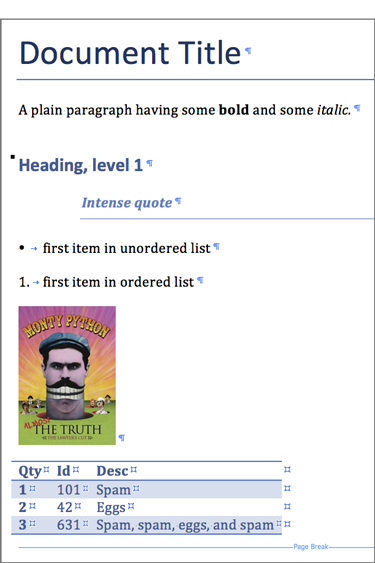
document.add_heading('Document Title', 0)

p = document.add_paragraph('A plain paragraph having some ')
p.add_run('bold').bold = True
p.add_run(' and some ')
p.add_run('italic.').italic = True

document.add_heading('Heading, level 1', level=1)
document.add_paragraph('Intense quote', style='IntenseQuote')

document.add_paragraph(
    'first item in unordered list', style='ListBullet'
)
document.add_paragraph(
    'first item in ordered list', style='ListNumber'
)

document.add_picture('monty-truth.png', width=Inches(1.25))

table = document.add_table(rows=1, cols=3)
hdr_cells = table.rows[0].cells
hdr_cells[0].text = 'Qty'
hdr_cells[1].text = 'Id'
hdr_cells[2].text = 'Desc'
for item in recordset:
    row_cells = table.add_row().cells
    row_cells[0].text = str(item.qty)
    row_cells[1].text = str(item.id)
    row_cells[2].text = item.desc

document.add_page_break()

document.save('demo.docx')
[/pastacode]
參考資料
https://python-docx.readthedocs.org/en/latest/#what-it-can-do
https://automatetheboringstuff.com/chapter13/